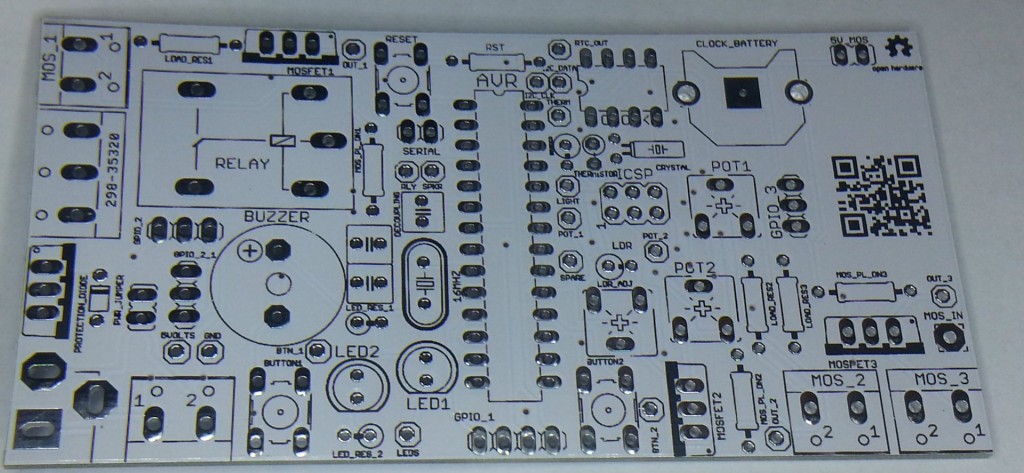
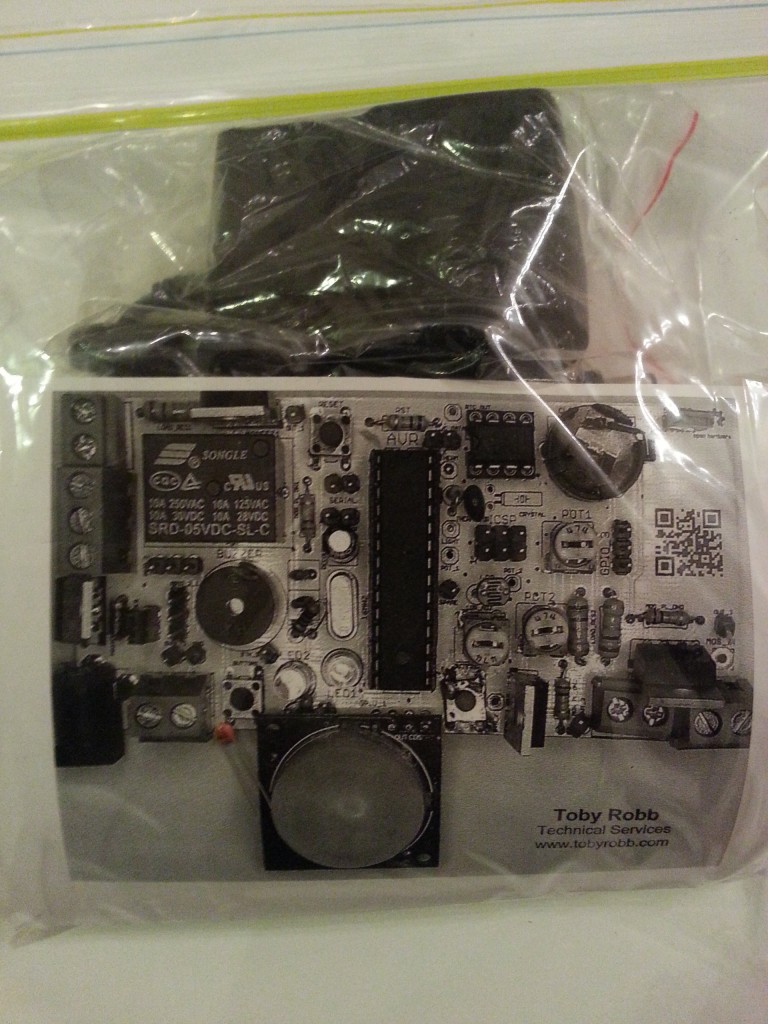
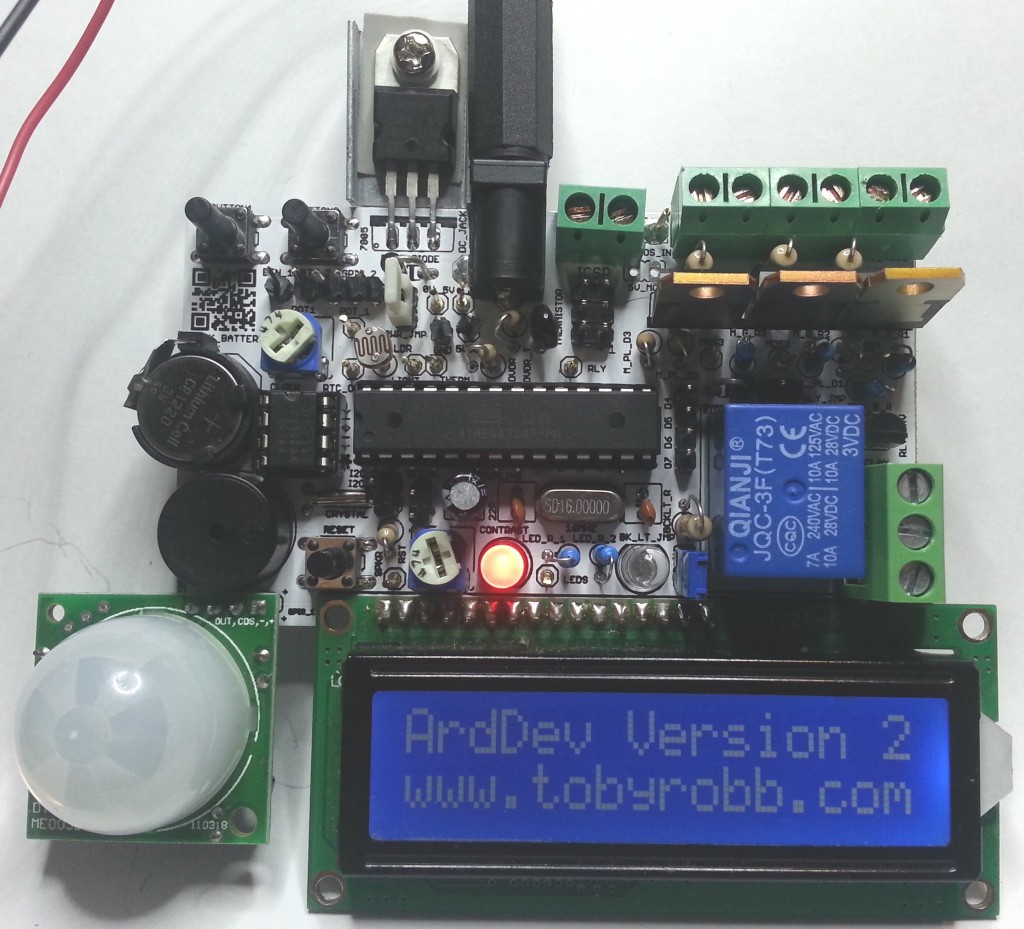
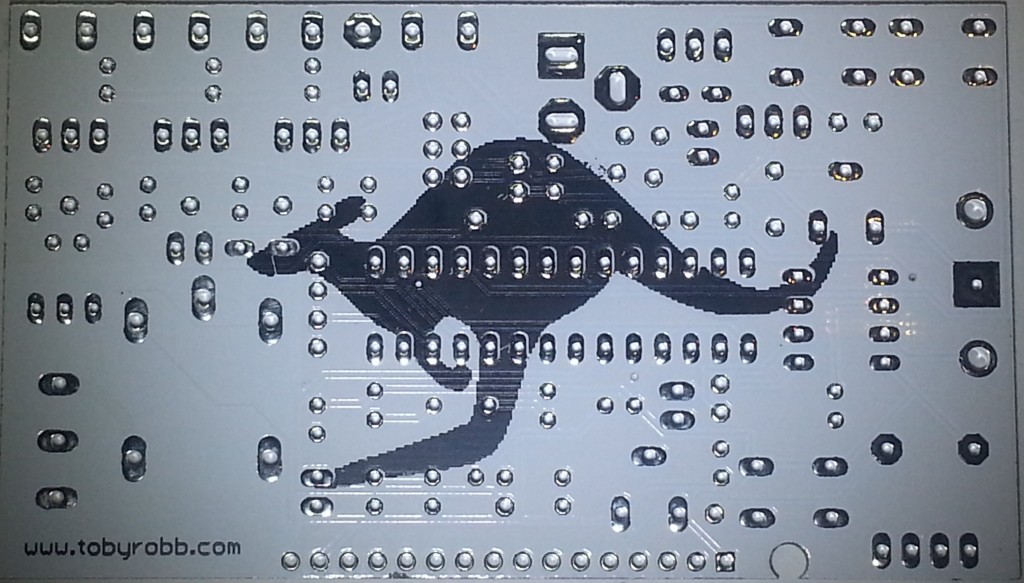
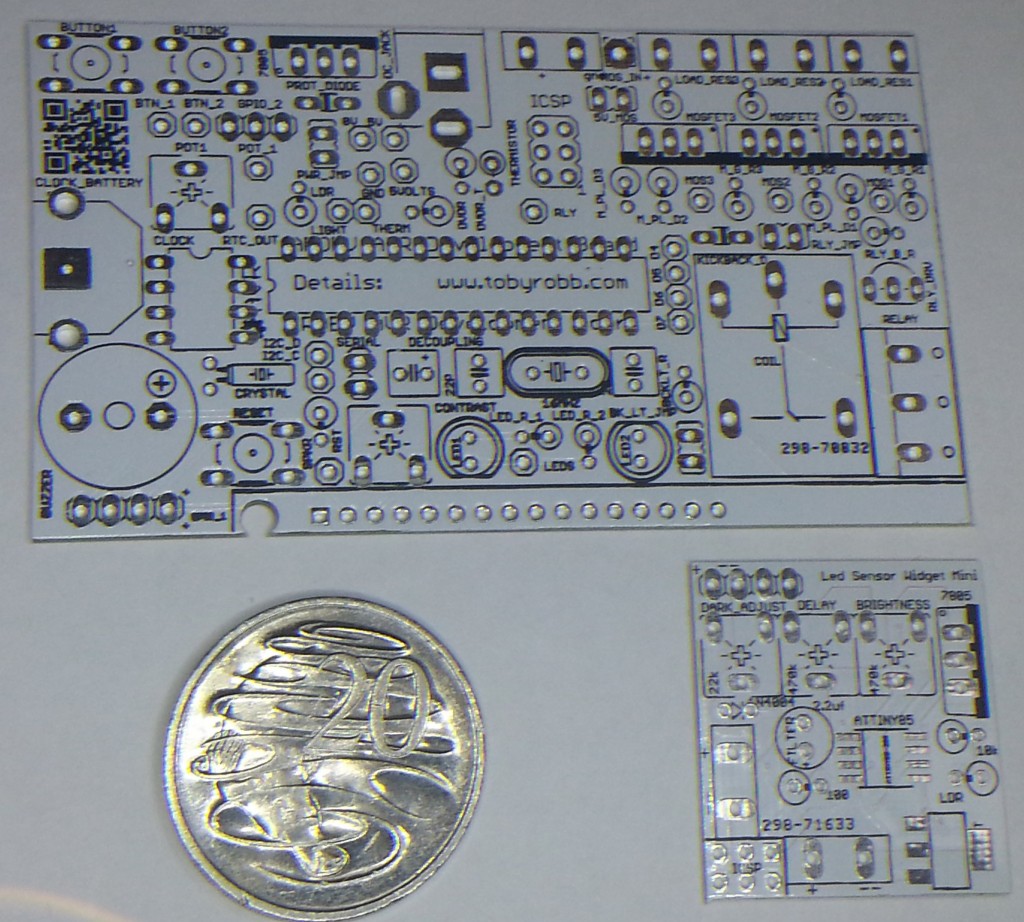
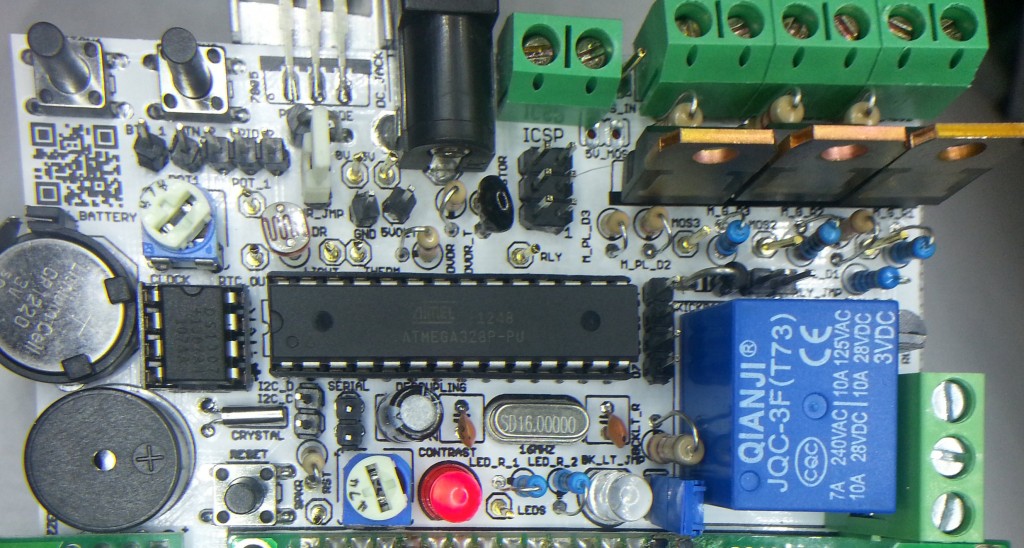
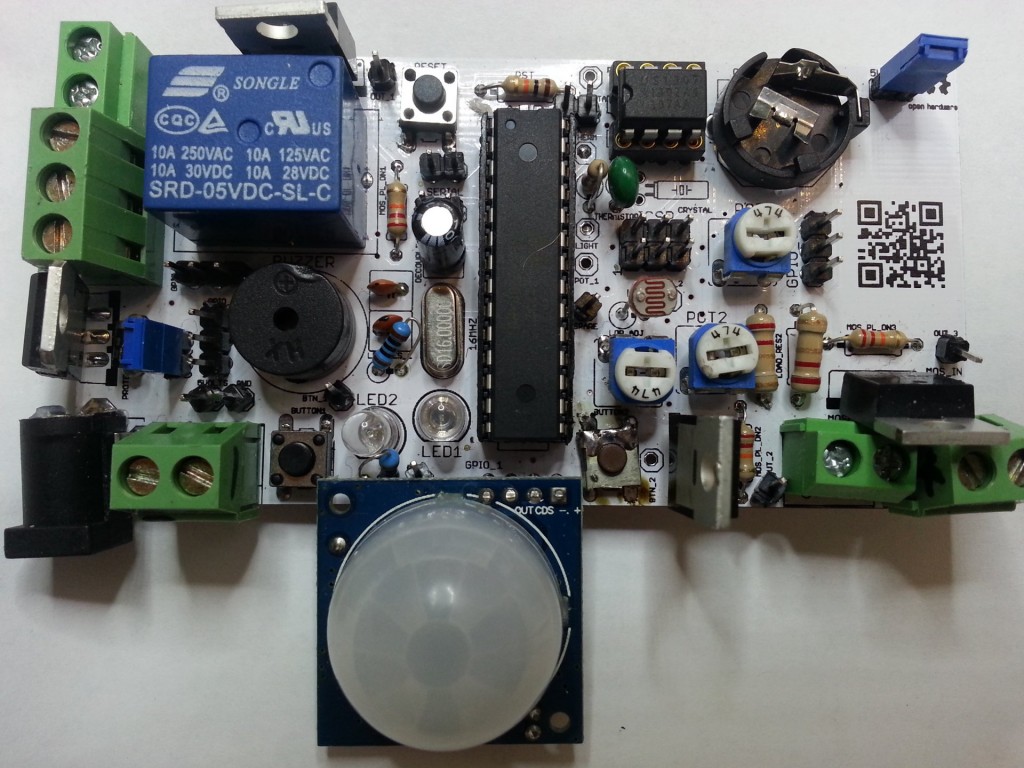
Here are some pics of the second version of my Arduino Development Board.
Very happy with the board, everything is working great, and its really feature packed!
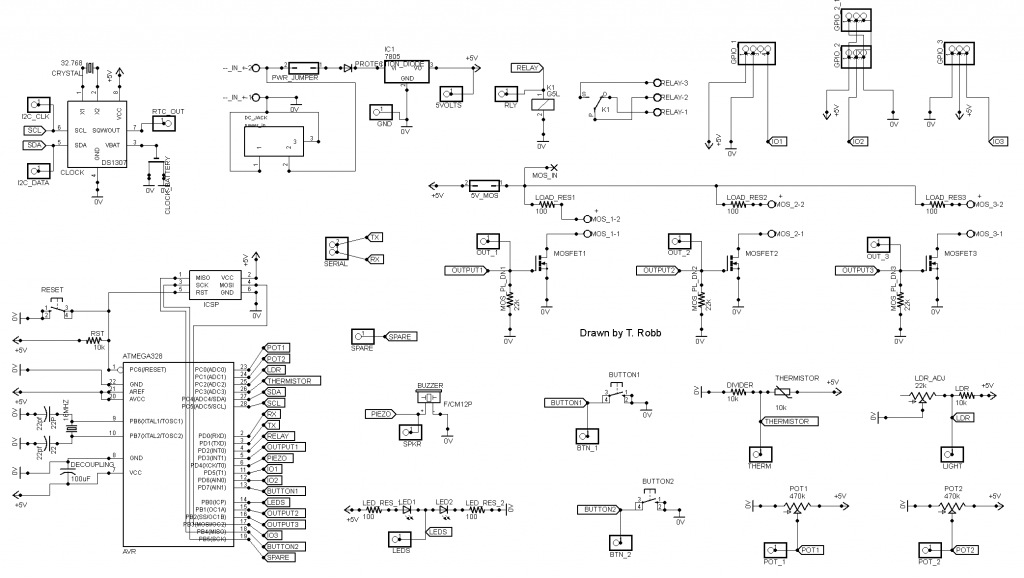
It has got..
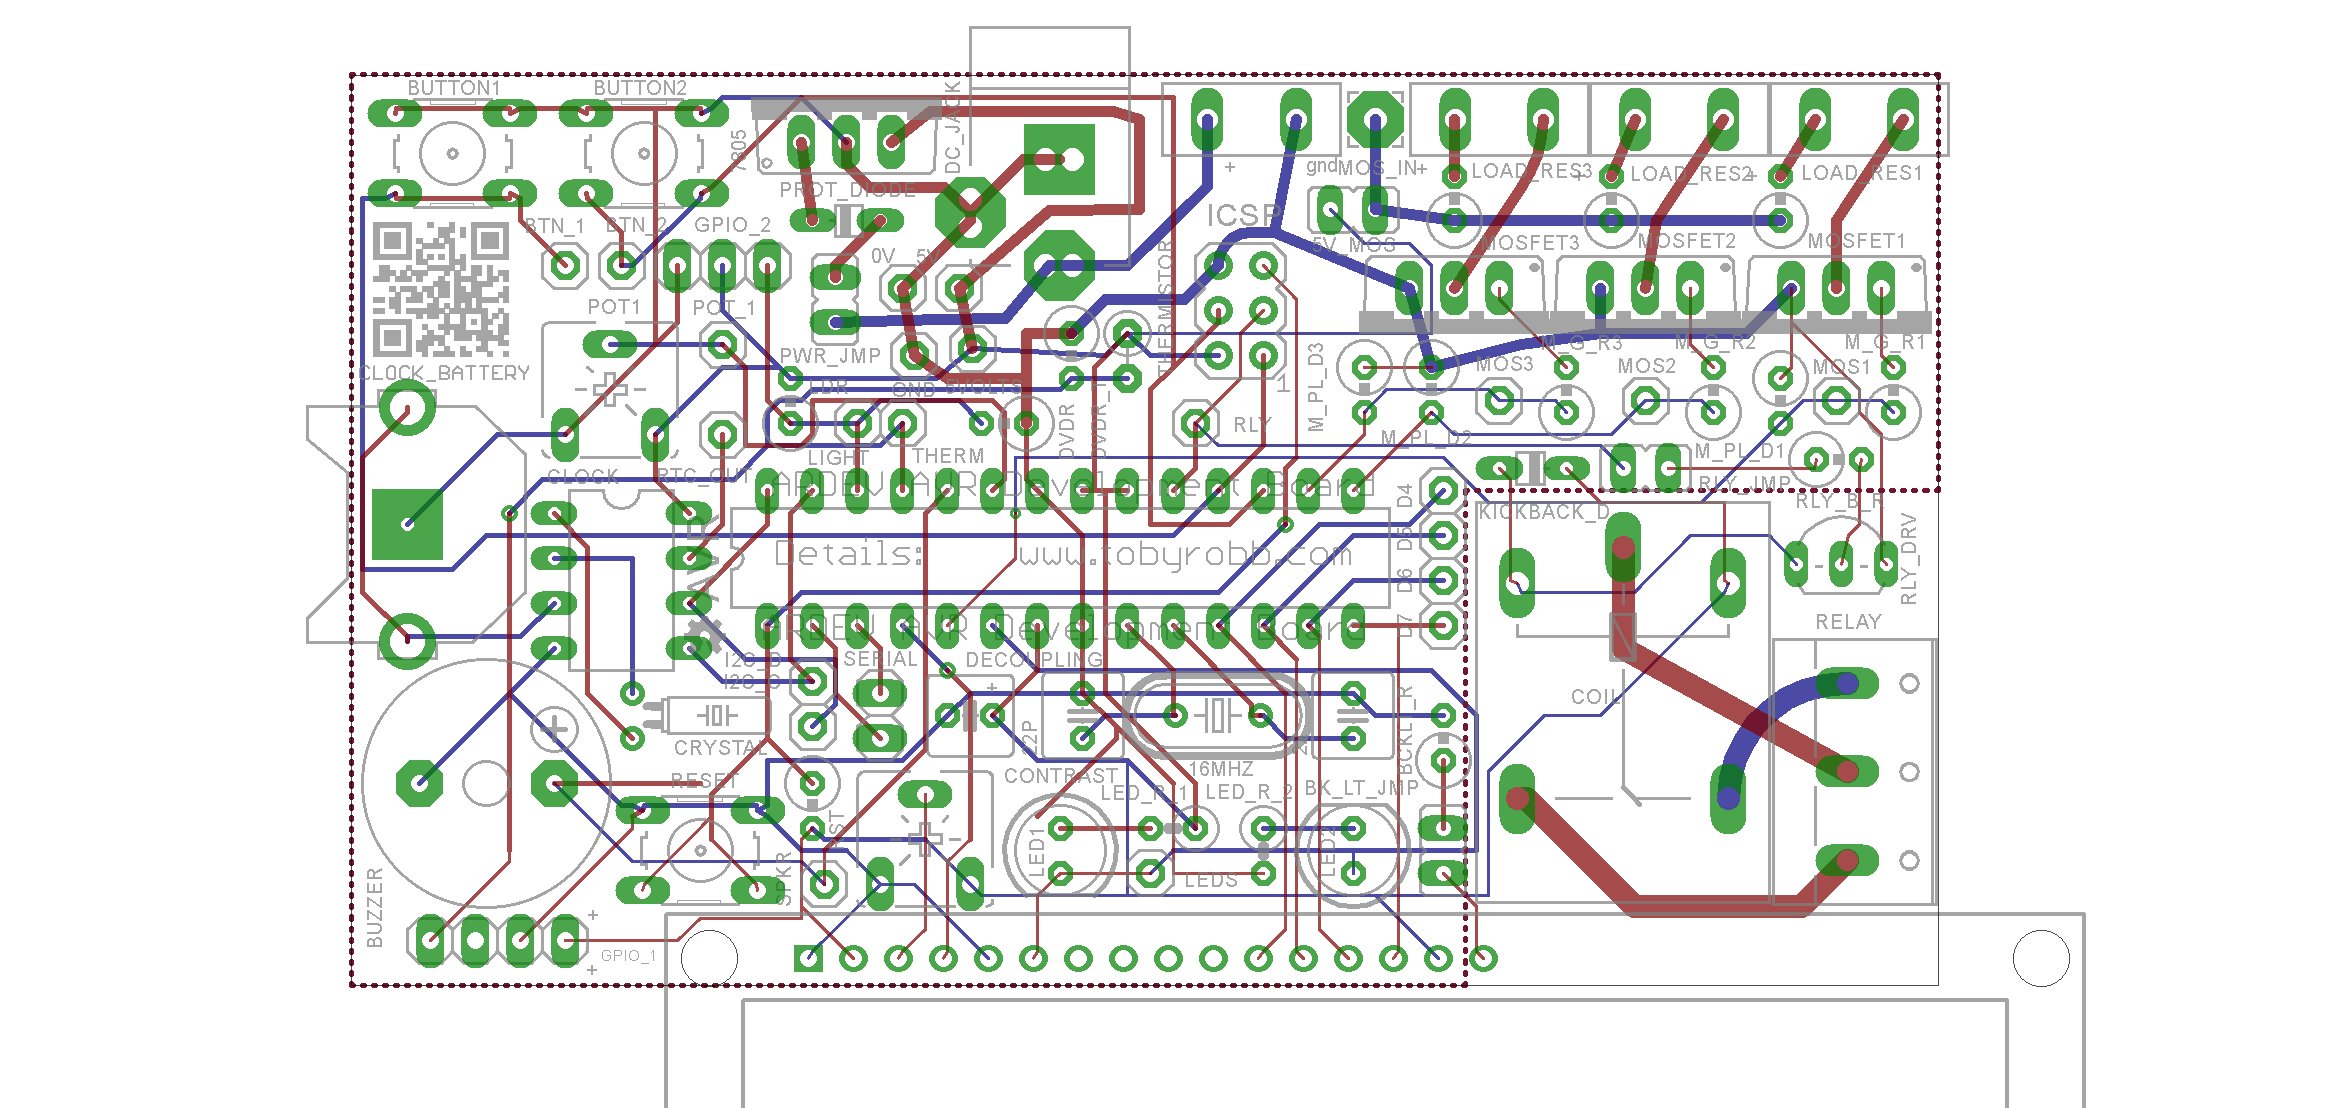
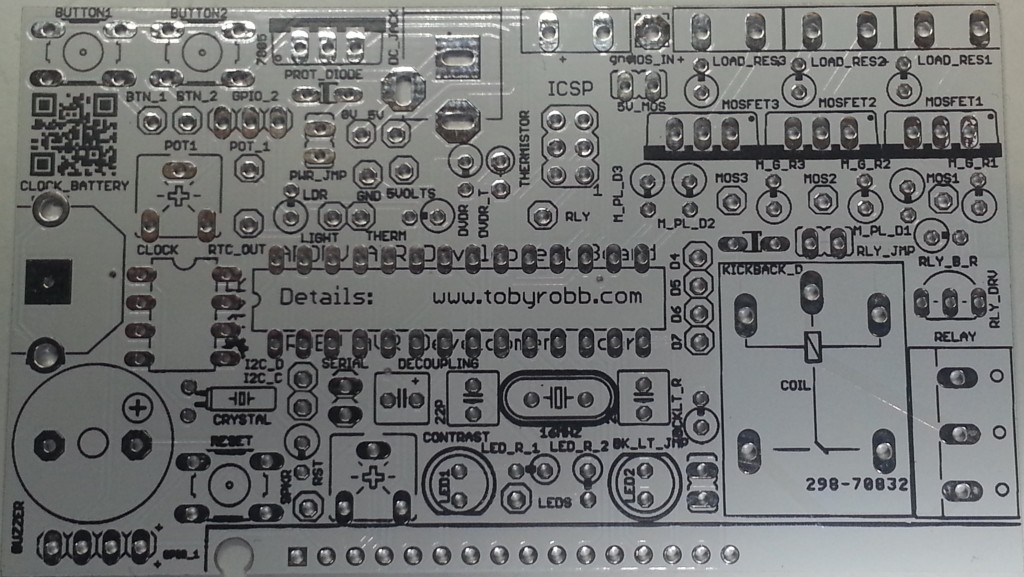
An LCD, a buzzer, 2 status leds, a potentiometer, a real time clock with battery backup, a high power relay (230v 10A), 3 high power PWM capable mosfets (60v 16A), 2 buttons, a temperature sensor, a movement sensor, a light sensor, a servo connector.
All pins are broken out to test headers. There is a on board 5v 1A supply with 7-35v DC barrel jack input or screw terminals. The relays and mosfet have screw terminals. The mosfets can be also supplied with an indepent voltage source.
Some of the uses if have put it to are :-
An LCD menu based Morse keyer/beacon.
An LCD based time clock with an alarm clock relay and bluetooth reporting and control.
An LCD based thermostat controller.
An LCD base RGB lighting controller.
A movement night sensor LED light.
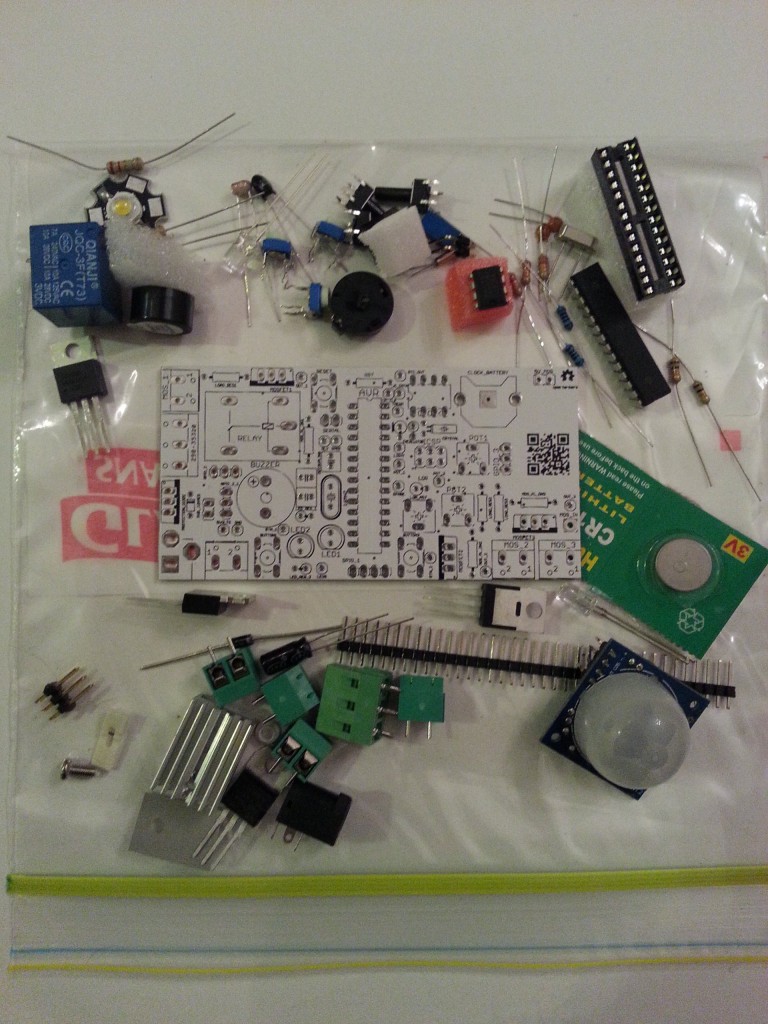
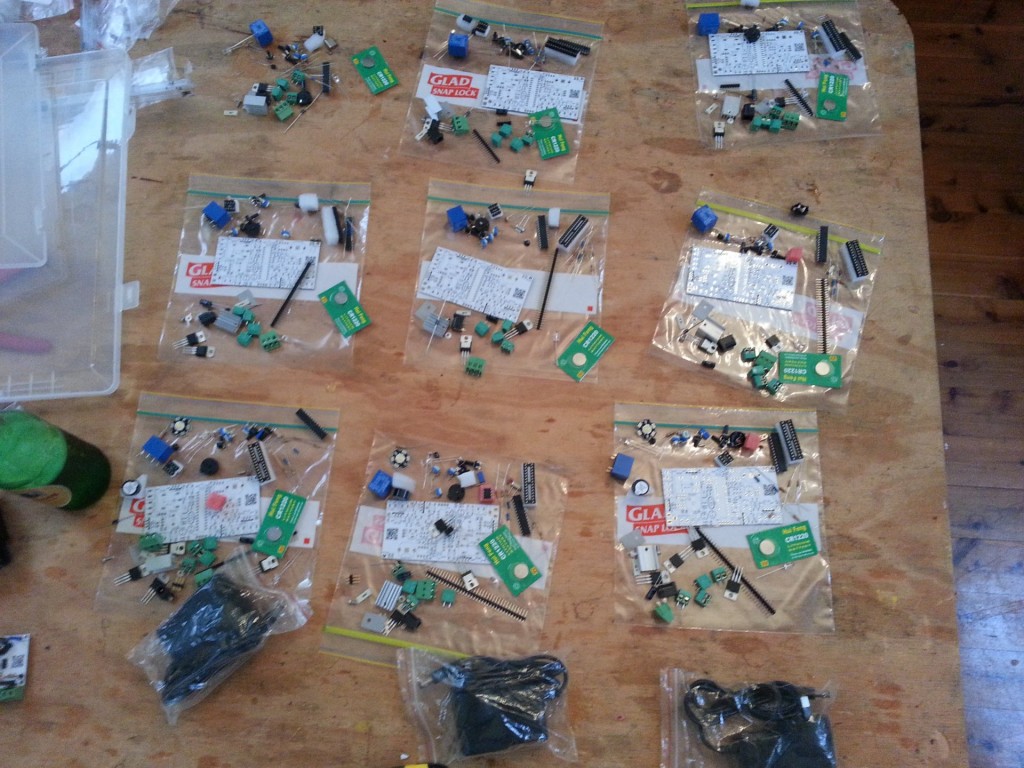
I got 10 PCB’s printed and sourced the parts for 10 kits. I can sell you some parts kits, ranging from $2 bare PCB only to about $40 for all the parts including a plug pack.
If you are interested in the design files for Eagle, or the gerber’s so you can print them off yourself, email me.
I really went to town with the code, i had my first attempt at using preprocessor directives to allow people to uncomment a config section to enable or disable periphals on the board, depending on what they have soldered in. For those who are interested i have posted my test sketch at the bottom.
/*
25 December 2013
Toby Robb
This is a test sketch for the Arduino Development board version 2
TODO LIST
Nothing yet
NOTES:
UNCOMMENT the correct sections for the peripherals you have installed
LED / LCD is the same pin, have only one or the other, is the LCD enable pin
RELAY is also the SCK pin *therefore may need to REMOVE relay jumper for programming
THERMISTOR / MOVEMENT SENSOR is the same pin, have only one or the other
LDR / SERVO is the same pin, have only one or the other
you must enable the internal pullups for the buttons by setting as inputs then writing HIGH
The leds if fitted also require the pullups to be enabled
*/
// Includes
#include <Servo.h> // Include the servo library
#include <Wire.h>
#include “RTClib.h” // For the clock
#include <LiquidCrystal.h> //for the LCD
//UNCOMMENT the correct sections for the peripherals you have installed
//PIR OR THERMISTOR not both
//LCD OR LED not both
//LDR OR SERVO not both
#define USE_LCD //uncomment this line if you have an LCD installed — NO leds at same time allowed
//#define USE_LED //uncomment this line if LED is installed — NO lcd at same time allowed
#define USE_PIR //uncomment this line if PIR is installed — NO thermistor at same time allowed
//#define USE_THERMISTOR //uncomment this line if THERMISTOR is installed — NO pir at same time allowed
#define USE_LDR //uncomment this line to use Light Dependent Resistor — NO servo at same time
//#define USE_SERVO //uncomment this line to use servo — NO ldr at same time
#define USE_BUZZER // uncomment this line to use BUZZER
#define USE_RTC // uncomment this line if the real time clock is fitted
#define USE_POT // uncomment this line to use POT (4:20!
#define USE_RELAY // uncomment this line to use RELAY
#define USE_BUTTON1 // uncomment this line to use BUTTON 1
#define USE_BUTTON2 // uncomment this line to use BUTTON 2
#define USE_MOS1 // uncomment this line to use MOSFET 1
#define USE_MOS2 // uncomment this line to use MOSFET 2
#define USE_MOS3 // uncomment this line to use MOSFET 3
RTC_DS1307 RTC; // Date and time functions using a DS1307 RTC connected via I2C and Wire lib
/* initialize the lcd library with the numbers of the interface pins
* LCD RS pin to digital pin 2
* LCD Enable pin to digital pin 4 //also the LED pin.. OFF to enable LCD
* LCD D4 pin to digital pin 5
* LCD D5 pin to digital pin 6
* LCD D6 pin to digital pin 7
* LCD D7 pin to digital pin 8
*/
LiquidCrystal lcd(2, 4, 5, 6, 7, 8); // Test code for LCD may need to be commented IN, LED code commented OUT
Servo servo1; // create servo object to control a servo
// a maximum of eight servo objects can be created
int servoPos = 0; // variable to store the servo position
// Defines
#define ldrPin A3 // Light dependant resistor pin on board.
#define thermistorPin A2 //Temperature thermistor pin on board.
#define ledPin 4 // Led pin High for one colour Low for another
#define buzzerPin A1 // The onboard buzzer pin
#define relayPin 13 // Pin for the relay
#define dataPin A4 // The I2C bus DATA pin
#define clockPin A5 // The I2C CLOCK pin
#define potPin A0 // Potentiometer on the board.
#define button1Pin 12 // Button 1 pin
#define button2Pin 11 // Button 2 pin
#define gpio1Pin A2 // General Purpose Input/output 1 pin
#define gpio2Pin A3 // General Purpose Input/output 2 pin
#define mosfet1Pin 3 // Mosfet 1 drive pin
#define mosfet2Pin 9 // Mosfet 2 drive pin
#define mosfet3Pin 10 // Mosfet 3 drive pin
// declare some variables here if you like
void setup(){
// Setup the serial
Serial.begin(9600);
Serial.println(“Beginning Setup”);
// Set up the pins
pinMode(ldrPin, INPUT); // If the light sensor resistor is fitted
pinMode(thermistorPin, INPUT); // If the temperature sensor resistor is fitted
pinMode(ledPin, OUTPUT); // You MUST use this if the LED’s are fitted.
pinMode(relayPin, OUTPUT); // If the relay is fitted.
pinMode(buzzerPin, OUTPUT); // If the buzzer is fitted.
pinMode(potPin, INPUT); // If the potentiometer is fitted
pinMode(button1Pin, INPUT); // If the button is fitted (write HIGH to enable pullups)
pinMode(button2Pin, INPUT); // If the button is fitted (write HIGH to enable pullups)
pinMode(mosfet1Pin, OUTPUT); // Mosfet 1 output
pinMode(mosfet2Pin, OUTPUT); // Mosfet 2 output
pinMode(mosfet3Pin, OUTPUT); // Mosfet 3 output
// default states
digitalWrite(dataPin, HIGH);
digitalWrite(clockPin, HIGH);
digitalWrite(relayPin, LOW);
digitalWrite(button1Pin, HIGH); // enables pullups for buttons
digitalWrite(button2Pin, HIGH); // enables pullups for buttons
#ifdef USE_LED
digitalWrite(ledPin, LOW); //enables pullups for LED’s
#endif
// set up the LCD’s number of columns and rows:
#ifdef USE_LCD
lcd.begin(16, 2);
lcd.clear();
#endif
#ifdef USE_SERVO
servo1.attach(gpio2Pin); // attaches the servo on pin gpio 2 to the servo object
servo1.write(0); //set servo to initial position
#endif
#ifdef USE_RTC
Wire.begin();
RTC.begin();
if (! RTC.isrunning()) {
Serial.println(“RTC is NOT running!”);
// uncommenting the following line sets the RTC to the date & time this sketch was compiled
// RTC.adjust(DateTime(__DATE__, __TIME__));
}
#endif
}
void loop(){
//lets do some error checking of the board hardware
#ifdef USE_LCD
#ifdef USE_LED
Serial.println(“CONFLICT! LCD and LEDS together is not allowed”);
lcd.setCursor(0,0);
lcd.print(“CONFLICT LCD/LED”);
lcd.setCursor(0,1);
lcd.print(“NOT BOTH AT ONCE”);
delay(5000);
#endif
#endif
#ifdef USE_PIR
#ifdef USE_THERMISTOR
Serial.println(“CONFLICT! PIR and THERMISTOR together is not allowed”);
lcd.setCursor(0,0);
lcd.print(” !! CONFLICT !! “);
lcd.setCursor(0,1);
lcd.print(“PIR + THERMISTOR”);
delay(5000);
#endif
#endif
#ifdef USE_LDR
#ifdef USE_SERVO
Serial.println(“CONFLICT! LDR and SERVO together is not allowed”);
lcd.setCursor(0,0);
lcd.print(” !! CONFLICT !! “);
lcd.setCursor(0,1);
lcd.print(” LDR + SERVO “);
delay(5000);
#endif
#endif
// Begin
#ifdef USE_LCD
lcd.clear();
lcd.setCursor(0,0);
lcd.print(“ArdDev Version 2″);
lcd.setCursor(0,1);
lcd.print(“www.tobyrobb.com”);
delay(3000);
#endif
#ifdef USE_LCD
lcd.clear();
lcd.setCursor(0,0);
lcd.print(“ArdDev Version 2″);
lcd.setCursor(0,1);
lcd.print(” Beeping buzzer “);
#endif
//beep the buzzer
#ifdef USE_BUZZER
Serial.println(“Beep”);
tone(buzzerPin, 500); // begin tone at 1000 hertz
delay(150); // wait half a sec
noTone(buzzerPin); // end beep
delay(2000);
#endif
//Print the time and date to the serial port
#ifdef USE_RTC
DateTime now = RTC.now();
Serial.print(now.year(), DEC);
Serial.print(‘/’);
Serial.print(now.month(), DEC);
Serial.print(‘/’);
Serial.print(now.day(), DEC);
Serial.print(‘ ‘);
Serial.print(now.hour(), DEC);
Serial.print(‘:’);
Serial.print(now.minute(), DEC);
Serial.print(‘:’);
Serial.print(now.second(), DEC);
Serial.println();
#ifdef USE_LCD
lcd.clear();
lcd.setCursor(0,0);
lcd.print(“Time: “);
lcd.setCursor(6,0);
lcd.print(now.hour(), DEC);
lcd.setCursor(8,0);
lcd.print(“:”);
lcd.setCursor(9,0);
lcd.print(now.minute(), DEC);
lcd.setCursor(0,1);
lcd.print(“Date: “);
lcd.setCursor(6,1);
lcd.print(now.day(), DEC);
lcd.setCursor(8,1);
lcd.print(“:”);
lcd.setCursor(9,1);
lcd.print(now.month(), DEC);
lcd.setCursor(11,1);
lcd.print(“:”);
lcd.setCursor(12,1);
lcd.print(now.year(), DEC);
delay(5000);
#endif
#endif
#ifdef USE_LED
//flash the leds
lcd.clear();
lcd.setCursor(0,0);
lcd.print(“ArdDev Version 2″);
lcd.setCursor(0,1);
lcd.print(” Flash the leds “);
Serial.println(“Flash the LED’s”);
for(int i = 0; i<=8; i++){
digitalWrite(ledPin, HIGH); // turn the LED on (HIGH is the voltage level)
delay(100); // wait for a second
digitalWrite(ledPin, LOW); // turn the LED off by making the voltage LOW
delay(100); // wait for a second
}
digitalWrite(ledPin, LOW); // turn the LED off ALSO LCD enable
delay(2000);
#endif
// Cycle the relay
#ifdef USE_RELAY
#ifdef USE_LCD
lcd.clear();
lcd.setCursor(0,0);
lcd.print(“ArdDev Version 2″);
lcd.setCursor(0,1);
lcd.print(” Relay ON “);
#endif
digitalWrite(relayPin, HIGH);
Serial.println(“Relay ON”);
delay(2000);
digitalWrite(relayPin, LOW);
Serial.println(“Relay OFF”);
#ifdef USE_LCD
lcd.setCursor(0,1);
lcd.print(” Relay OFF “);
#endif
delay(2000);
#endif
// Sweep the servo on GPIO 2
#ifdef USE_SERVO
#ifdef USE_LCD
lcd.clear();
lcd.setCursor(0,0);
lcd.print(“ArdDev Version 2″);
lcd.setCursor(0,1);
lcd.print(“Sweep servo “);
lcd.setCursor(12,1);
#endif
for(servoPos = 0; servoPos < 180; servoPos += 1) // goes from 0 degrees to 180 degrees
{ // in steps of 1 degree
servo1.write(servoPos); // tell servo to go to position in variable ‘servoPos’
if((servoPos>=0) && (servoPos<=9)){
#ifdef USE_LCD
lcd.setCursor(12,1);
lcd.print(servoPos);
lcd.setCursor(13,1);
lcd.print(” “);
#endif
}
if((servoPos>=10) && (servoPos<=99)){
#ifdef USE_LCD
lcd.setCursor(12,1);
lcd.print(servoPos);
lcd.setCursor(14,1);
lcd.print(” “);
#endif
}
if((servoPos>=100) && (servoPos<=999)){
#ifdef USE_LCD
lcd.setCursor(12,1);
lcd.print(servoPos);
lcd.setCursor(15,1);
lcd.print(” “);
#endif
}
if(servoPos>=1000){
#ifdef USE_LCD
lcd.setCursor(12,1);
lcd.print(servoPos);
#endif
}
Serial.print(“Sweep the servo “);
Serial.println(servoPos);
delay(5); // waits 15ms for the servo to reach the position
}
for(servoPos = 180; servoPos>=1; servoPos-=1) // goes from 180 degrees to 0 degrees
{
servo1.write(servoPos); // tell servo to go to position in variable ‘servoPos’
if((servoPos>=0) && (servoPos<=9)){
#ifdef USE_LCD
lcd.setCursor(12,1);
lcd.print(servoPos);
lcd.setCursor(13,1);
lcd.print(” “);
#endif
}
if((servoPos>=10) && (servoPos<=99)){
#ifdef USE_LCD
lcd.setCursor(12,1);
lcd.print(servoPos);
lcd.setCursor(14,1);
lcd.print(” “);
#endif
}
if((servoPos>=100) && (servoPos<=999)){
#ifdef USE_LCD
lcd.setCursor(12,1);
lcd.print(servoPos);
lcd.setCursor(15,1);
lcd.print(” “);
#endif
}
if(servoPos>=1000){
#ifdef USE_LCD
lcd.setCursor(12,1);
lcd.print(servoPos);
#endif
}
Serial.print(“Sweep the servo “);
Serial.println(servoPos);
delay(5); // waits 15ms for the servo to reach the position
}
delay(2000);
#endif
// Print the value of the button states
#ifdef USE_BUTTON1
#ifdef USE_LCD
lcd.clear();
#endif
for(int i = 0; i <=200; i++){
#ifdef USE_LCD
lcd.setCursor(0,0);
lcd.print(” Button 1 State “);
if(digitalRead(button1Pin)==HIGH){
lcd.setCursor(0,1);
lcd.print(” OFF “);
}
if(digitalRead(button1Pin)==LOW){
lcd.setCursor(0,1);
lcd.print(” ON “);
}
#endif
Serial.print(“Button one state : “);
Serial.println(digitalRead(button1Pin));
}
delay(2000);
#endif
#ifdef USE_BUTTON2
#ifdef USE_LCD
lcd.clear();
#endif
for(int i = 0; i <=200; i++){
#ifdef USE_LCD
lcd.setCursor(0,0);
lcd.print(” Button 2 State “);
if(digitalRead(button2Pin)==HIGH){
lcd.setCursor(0,1);
lcd.print(” OFF “);
}
if(digitalRead(button2Pin)==LOW){
lcd.setCursor(0,1);
lcd.print(” ON “);
}
#endif
Serial.print(” Button two state : “);
Serial.println(digitalRead(button2Pin));
}
delay(2000);
#endif
// Show the value of the LDR for a few seconds
#ifdef USE_LDR
#ifdef USE_LCD
lcd.clear();
lcd.setCursor(0,0);
lcd.print(“ArdDev Version 2″);
lcd.setCursor(0,1);
lcd.print(“Brightness “);
#endif
for(int i = 0; i <=500; i++){
if((analogRead(ldrPin)>=0) && (analogRead(ldrPin)<=9)){
#ifdef USE_LCD
lcd.setCursor(12,1);
lcd.print(analogRead(ldrPin));
lcd.setCursor(13,1);
lcd.print(” “);
#endif
}
if((analogRead(ldrPin)>=10) && (analogRead(ldrPin)<=99)){
#ifdef USE_LCD
lcd.setCursor(12,1);
lcd.print(analogRead(ldrPin));
lcd.setCursor(14,1);
lcd.print(” “);
#endif
}
if((analogRead(ldrPin)>=100) && (analogRead(ldrPin)<=999)){
#ifdef USE_LCD
lcd.setCursor(12,1);
lcd.print(analogRead(ldrPin));
lcd.setCursor(15,1);
lcd.print(” “);
#endif
}
if(analogRead(ldrPin)>=1000){
#ifdef USE_LCD
lcd.setCursor(12,1);
lcd.print(analogRead(ldrPin));
#endif
}
Serial.print(“The Brightness : “);
Serial.println(analogRead(ldrPin));
}
delay(2000);
#endif
#ifdef USE_PIR
#ifdef USE_LCD
lcd.clear();
lcd.setCursor(0,0);
lcd.print(“ArdDev Version 2″);
lcd.setCursor(0,1);
#endif
for(int i = 0; i <=600; i++){
if(analogRead(thermistorPin)>=127){
#ifdef USE_LCD
lcd.setCursor(0,1);
lcd.print(“Movement detect!”);
#endif
Serial.print(“Movement detected! “);
}
if(analogRead(thermistorPin)<=126){
#ifdef USE_LCD
lcd.setCursor(0,1);
lcd.print(” No Movement “);
#endif
Serial.print(“NO Movement detected “);
}
Serial.println(analogRead(thermistorPin));
}
#endif
#ifdef USE_THERMISTOR
//show the value of the temperature thermistor for a few seconds
#ifdef USE_LCD
lcd.clear();
lcd.setCursor(0,0);
lcd.print(“ArdDev Version 2″);
lcd.setCursor(0,1);
lcd.print(“Degrees C “);
lcd.setCursor(0,1);
#endif
for(int i = 0; i <=500; i++){
if((Thermistor(analogRead(thermistorPin))>=0) && (Thermistor(analogRead(thermistorPin))<=9)){
#ifdef USE_LCD
lcd.setCursor(12,1);
lcd.print(Thermistor(analogRead(thermistorPin)));
lcd.setCursor(13,1);
lcd.print(” “);
#endif
}
if((Thermistor(analogRead(thermistorPin))>=10) && (Thermistor(analogRead(thermistorPin))<=99)){
#ifdef USE_LCD
lcd.setCursor(12,1);
lcd.print(Thermistor(analogRead(thermistorPin)));
lcd.setCursor(14,1);
lcd.print(” “);
#endif
}
if((Thermistor(analogRead(thermistorPin))>=100) && (Thermistor(analogRead(thermistorPin))<=999)){
#ifdef USE_LCD
lcd.setCursor(12,1);
lcd.print(analogRead(thermistorPin));
lcd.setCursor(15,1);
lcd.print(” “);
#endif
}
if(Thermistor(analogRead(thermistorPin))>=1000){
#ifdef USE_LCD
lcd.setCursor(12,1);
lcd.print(analogRead(thermistorPin));
#endif
}
Serial.print(“The Temperature : “);
Serial.println(analogRead(thermistorPin));
}
delay(2000);
#endif
// Print off the potentiometer value for a few seconds
#ifdef USE_POT
#ifdef USE_LCD
lcd.clear();
lcd.setCursor(0,0);
lcd.print(“ArdDev Version 2″);
lcd.setCursor(0,1);
lcd.print(“Pot “);
lcd.setCursor(0,1);
#endif
for(int i = 0; i <=500; i++){
if((analogRead(potPin)>=0) && (analogRead(potPin)<=9)){
#ifdef USE_LCD
lcd.setCursor(12,1);
lcd.print(analogRead(potPin));
lcd.setCursor(13,1);
lcd.print(” “);
#endif
}
if((analogRead(potPin)>=10) && (analogRead(potPin)<=99)){
#ifdef USE_LCD
lcd.setCursor(12,1);
lcd.print(analogRead(potPin));
lcd.setCursor(14,1);
lcd.print(” “);
#endif
}
if((analogRead(potPin)>=100) && (analogRead(potPin)<=999)){
#ifdef USE_LCD
lcd.setCursor(12,1);
lcd.print(analogRead(potPin));
lcd.setCursor(15,1);
lcd.print(” “);
#endif
}
if(analogRead(potPin)>=1000){
#ifdef USE_LCD
lcd.setCursor(12,1);
lcd.print(analogRead(potPin));
#endif
}
Serial.print(“Potentiometer one : “);
Serial.println(analogRead(potPin));
}
delay(2000);
#endif
// Test the mosfets
#ifdef USE_MOS1
#ifdef USE_LCD
lcd.clear();
lcd.setCursor(0,0);
lcd.print(“ArdDev Version 2″);
lcd.setCursor(0,1);
lcd.print(” Mosfet 1 blink “);
#endif
Serial.println(“Mosfet 1 blink”);
digitalWrite(mosfet1Pin, HIGH);
delay(250);
digitalWrite(mosfet1Pin, LOW);
delay(2000);
#endif
#ifdef USE_MOS2
#ifdef USE_LCD
lcd.clear();
lcd.setCursor(0,0);
lcd.print(“ArdDev Version 2″);
lcd.setCursor(0,1);
lcd.print(” Mosfet 2 blink “);
#endif
Serial.println(“Mosfet 2 blink”);
digitalWrite(mosfet2Pin, HIGH);
delay(250);
digitalWrite(mosfet2Pin, LOW);
delay(2000);
#endif
#ifdef USE_MOS3
#ifdef USE_LCD
lcd.clear();
lcd.setCursor(0,0);
lcd.print(“ArdDev Version 2″);
lcd.setCursor(0,1);
lcd.print(” Mosfet 3 blink “);
#endif
Serial.println(“Mosfet 3 blink”);
digitalWrite(mosfet3Pin, HIGH);
delay(250);
digitalWrite(mosfet3Pin, LOW);
delay(2000);
#endif
//end of main loop
}
#ifdef USE_THERMISTOR
double Thermistor(int RawADC) {
// Inputs ADC Value from Thermistor and outputs Temperature in Celsius
// requires: include <math.h>
// Utilizes the Steinhart-Hart Thermistor Equation:
// Temperature in Kelvin = 1 / {A + B[ln(R)] + C[ln(R)]^3}
// where A = 0.001129148, B = 0.000234125 and C = 8.76741E-08
long Resistance; double Temp; // Dual-Purpose variable to save space.
Resistance=((10240000/RawADC) - 10000); // Assuming a 10k Thermistor. Calculation is actually: Resistance = (1024 * BalanceResistor/ADC) - BalanceResistor
Temp = log(Resistance); // Saving the Log(resistance) so not to calculate it 4 times later. // “Temp” means “Temporary” on this line.
Temp = 1 / (0.001129148 + (0.000234125 * Temp) + (0.0000000876741 * Temp * Temp * Temp)); // Now it means both “Temporary” and “Temperature”
Temp = Temp - 273.15; // Convert Kelvin to Celsius // Now it only means “Temperature”
// // BEGIN- Remove these lines for the function not to display anything
// Serial.print(“ADC: “); Serial.print(RawADC); Serial.print(“/1024″); // Print out RAW ADC Number
// Serial.print(“, Volts: “); printDouble(((RawADC*5)/1024.0),3); // 4.860 volts is what my USB Port outputs.
// Serial.print(“, Resistance: “); Serial.print(Resistance); Serial.print(“ohms”);
// // END- Remove these lines for the function not to display anything
// Uncomment this line for the function to return Fahrenheit instead.
//Temp = (Temp * 9.0)/ 5.0 + 32.0; // Convert to Fahrenheit
return Temp; // Return the Temperature
}
#endif
 At first I just layed out the Atmega with its crystal and 2 caps. Then i thought I may as well add a voltage regulator and power cap as well.